


Games Workshop very kindly furnished me with a copy of the Leagues of Votann army set, a (sort of) brand new faction for Warhammer 40k to paint up, with a suggestion to do them in one of the schemes presented in the Codex itself. As you can see above, I managed to paint most of the set in time, I’ve just got 10 more of the Hearthkyn Warriors left to finish up.
You can see my work, and that of other painters from around the Warhammer Community, in the blog post here!
I wanted to give a little advice on how you can paint your Votann the way I did – it’s a little different to the way they do it in the official tutorials on Youtube as I was kind of working by eye from the Codex and obviously putting in my own touches here and there too.
So, let’s take a look at the various areas now!

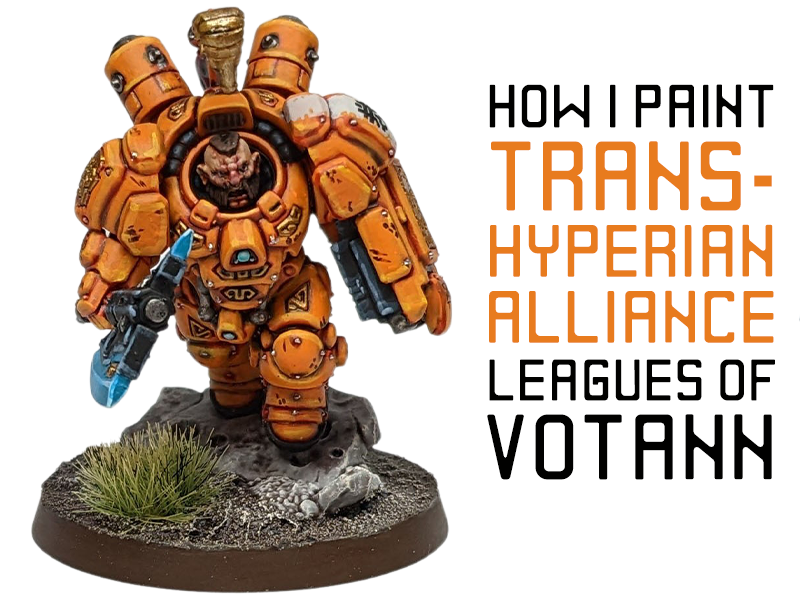
The biggest and most prominent feature of the models is the striking orange armour. This is what gives the Trans-Hyperian Alliance such a unique look, even amongst the other factions of 40k where orange is rarely featured.
I began over my White Scar primer with the contrast paint Magmadroth Flame. This was then given a shade of Nuln Oil to deepen the darkness in the recesses, as Magmadroth Flame is a very solid, flat orange right out of the bottle unlike many other Contrast colours. You could instead use one coat of Gryph-Hound Orange if you want less steps, but you’ll get a less even orange to work from.
Next I used Fire Dragon Bright in thin layers, building up over the darker orange until it was nice and smooth, but leaving the darker colour in recesses and areas of heavy shadow.
To highlight, I mixed in a little Phalanx Yellow for edge highlighting, before using pure Phalanx Yellow for the very top dot highlights in key areas.

For the dirty greatcoat of the Kahl, I began by painting the whole thing with Black Legion contrast paint. This is a fantastic paint that covers excellently in one layer to give a smooth, consistent black. I then used Mechanicus Standard Grey and Dawnstone for highlighting the edges and raised folds.
To dirty the coat up, I took Steel Legion Drab and used a drybrushing technique over the lower third of the coat, being heaviest towards the very bottom. This builds up into a convincing grimy dirt texture and helps ground the model.

The battle damage was simply dots and scratches with Thondia Brown paint. If you wanted to make it more realistic, you can use the lighter orange/yellow mix to highlight the lower part of every brown scratch to create the illusion of depth, but I was rushing to get as much painted as I could for the article ^_^;;

For all of the golden details, I began with Retributor Armour paint, then applied Agrax Earthshade over the top of this. I then highlighted with Liberator Gold.

For the white stripes, I used Corax White. Thinning the paint so it goes on smooth, paint in the outline of the stripe first, then fill it in. Two or three thin layers will get you a lovely smooth white finish. Then, take Fire Dragon Bright and add dots and scratches to the edges and a few of the flat areas to create a realistic worn-off paint effect.

I painted the trousers and belts with Vallejo German Grey (Corvus Black from GW would likely be much the same), then shaded with Nuln Oil. This was highlighted with layers of thinned Mechanicus Standard Grey and Dawnstone just like the greatcoat.

For the black weapons (also the armour panels of the hoverbikes!) I began with Black Legion contrast paint all over. This was edge highlighted first with Stegadon Scale Green, then a lighter highlight with Thunderhawk Blue. Finally, a few spots were highlighted with Fenrisian Grey.

For the skin, I used Guilliman Flesh contrast paint all over to begin with. I then raised up with highlights of Cadian Fleshtone and Kislev Flesh. To help the skin look more alive, I thinned Volupus Pink contrast paint down a lot with water and applied it to the nose and cheeks to create a reddish tone to the skin.

The power axe was painted with Vallejo Game Colour Turquoise. I created highlights by mixing in a little Game Colour Verdigris a tiny bit at a time to create a gradiated stripe texture on the blade, and a nice edge highlight. These colours were also used on lenses and plasma weapon bits too.


