
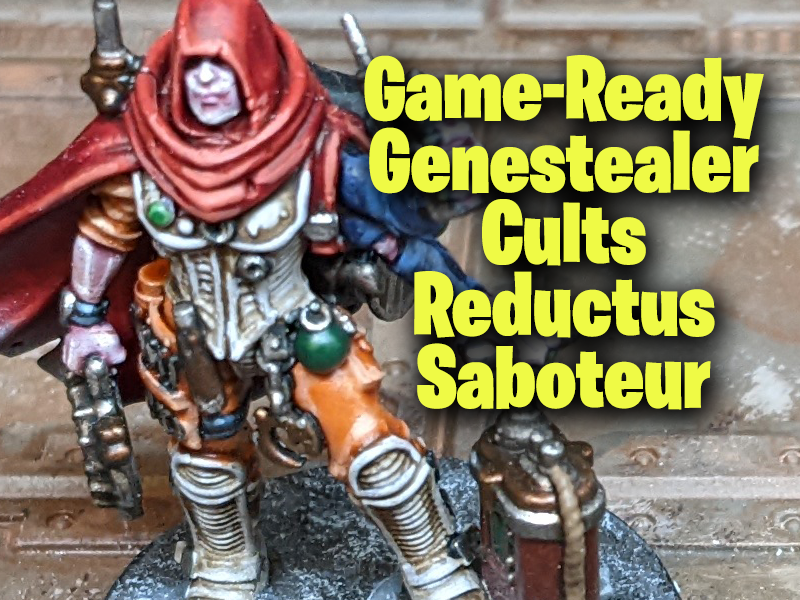
I absolutely love my Genestealer Cults, I do. So I was delighted when a free preview copy of Shadow Throne from Games Workshop arrived at my doorstep, I knew immediately I wanted to do a painting guide for the Reductus Saboteur. However, I also wanted to make the model my own, in some way. Luckily, hot on the heels of building my Necromunda Underhive Outcasts gang, I remembered I had a hooded head that I thought would go perfectly with the cape and scarf worn by the explosives specialist! I think it makes her look rather more mysterious, plus I get to use the two heads that she comes with on my next unit of Neophytes!
Disclaimer: I’m no ‘Eavy Metal painter, so I won’t pretend that I’ll ever post really high level, clean painting here on the blog. But if you’re someone who enjoys painting and wants to improve with easily achievable results I hope my tutorials will prove useful.


With my small conversion done, I started by priming the model with Grey Seer spray. You will probably notice I didn’t get the smoothest finish – it was a pretty cold and rainy day when I primed her so it definitely affected the quality of my priming. However, rather than strip it and try again another day, I was happy enough to continue. The imperfections the camera makes obvious are barely visible to the naked eye. Either that or I need new glasses…
I started by picking out all her over-armour with Agrax Earthshade, dropping some Contrast Wyldwood into the deeper recesses to help define the shapes. This gives a nice dirty/oily look to the armour.


Next up I went in with Flesh Tearer’s Red contrast on the hood and cape. Because it’s a strong colour and it’s a bit of a tight squeeze round the back of the model’s legs, you might splodge the red where you don’t want it. Luckily because we’re in the early stages, its easy to back over with Grey Seer once the red has dried and clean up the major mistakes. Next up, I picked out the face, arm and hands with Magos Purple contrast paint, to give the skin that real alien appearance.


After this, I took Gryph-Hound Orange and painted the “boiler suit” under the armour areas, and painted the chitinous armour areas with Leviadon Blue contrast. Then I picked out most of the other areas with Black Templar paint. The black templar will help any metallics look better than they would against white.


Next up, the metal areas were painted with Leadbelcher. You can see the reverse shot here of what I did on the backpack in silver and which areas I left black. I also painted the model’s claws in Incubi Darkness.


The cape and hood were highlighted in succession with highlights of Mephiston Red, Wild Rider Red and Squig Orange. I also finally remembered to apply some agrax to the metallic areas.


I highlighted the orange overalls next using Kislev Flesh, then highlighted the skin with a little bit of Wraithbone. Then I took Altdorf Guard Blue and Calgar Blue and highlighted the two blue chitin arms.


I applied Blood Angels Red to the explosive device, gore grunta fur to some of the metal areas to create a bronze effect, and then highlighted the black areas using Thunderhawk Blue and Fenrisian Grey edge highlights.


Next I used a few more contrast paints such as Ork Flesh to pick out details like grenades, screens etc. The metallics were given a quick highlight with Stormhost Silver.


Finally I painted the fuse with Steel Legion Drab (I forgot to show this, but this can be shaded with Agrax Earthshade) I applied Astrogranite texture paint to the base, painted the rock with mechanicus standard grey, and then when dry applied Agrax over all the basing materials. These areas were then drybrushed Celestra Grey. The rim of the base was painted with a few coats of Abaddon Black.
At this point, the model is ready for the tabletop. Again, it’s definitely no ‘Eavy Metal job but I think it looks great for a fairly fast game-ready level. I need to remember to put a picture of the bomb itself below here:


