Just a quick note to say get ready for PaintSlam22!
Download your hobby log, join the discord and lets hobby!!
Just a quick note to say get ready for PaintSlam22!
Download your hobby log, join the discord and lets hobby!!

As the year winds down, now is the perfect time to look at what the PaintSlam community painted up for the Festive Finale event! This was a simple challenge to end the year on, to paint models that are predominantly in the festive colours of red, green and white. Let’s take a look at what you folks came up with!!
Anvil242


From Anvil we have these wonderful redshirts, plus a small starcraft to give us that little bit of green!
BigGeordieGeek


Some fab decorations here from BGG, including a Starfleet logo, dizzy egg, a mimic gift, the ghostbusters logo and even the crest of Hyrule!
CritonyEntertainment


CritonyEntertainment has been as productive as ever with these festive Power Rangers types!
Gurt


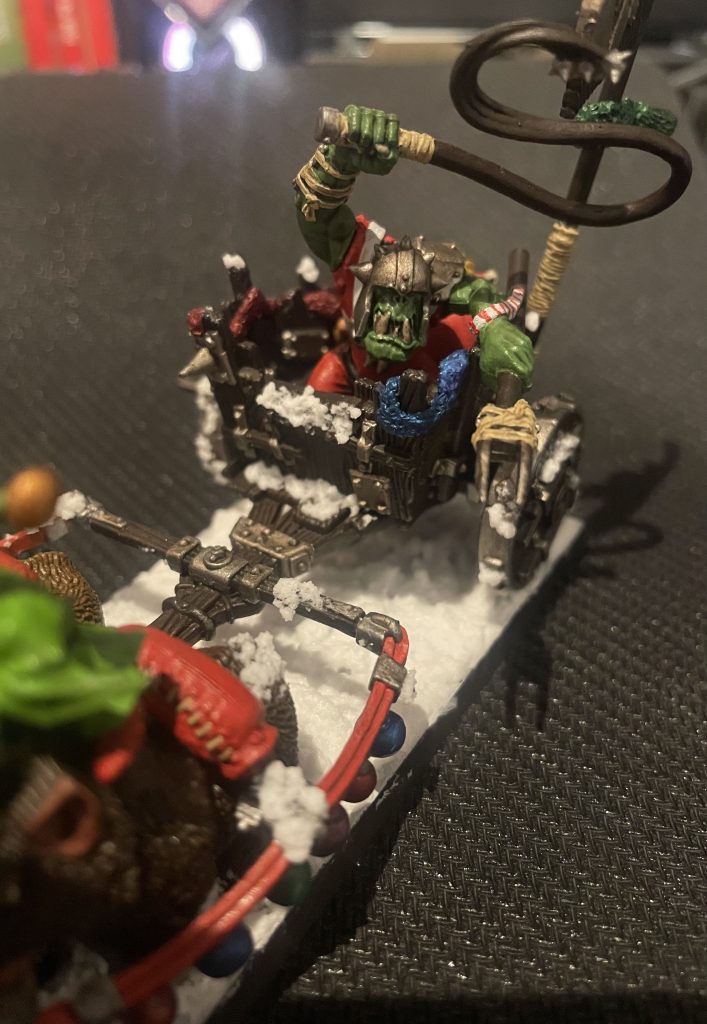


If we had judges, this would surely be in for a Judges Favourite award, as it’s a festive Orc chariot complete with grotty little helpers and all sorts of festive details! Lovely work!
JewelKnightJess


Anvil Industry’s female commissar was my pick for the Festive Finale, so I focussed on her rich red coat and green trousers, with a nice application of snow on the base and bottom of her coat!
Jim1810


Jim brings us the first Red Gobbo of the showcase, but it certainly isn’t the last! This is the first of the festive Red Gobbo models GW released, and looks fantastic with his gift list as he stands atop a few “presents”, which may or may not be hugely explosive!
MattyAsherIsaac

I adore this festive badger model! It’s really cute and captures the cold winter vibe nicely!
Mommy Negan

Mommy Negan really leans into the mean green with a classic Nurgle model. Perhaps he’s the Nurgle Grinch?
PSippitt

Pete brings us his rendition of the 2021 Red Gobbo mini, with Bounder. I really like the shiny wine-coloured bauble nose and the stripes on the candy cane dynamite stick look great!
Pyro

Pyro brings us this awesome Barbarian Santa! The white fur looks fantastic and the splashes of gold give the model a real warmth alongside the rich reds.
ThePoshGoblin

And to cap it off we have another rendition of the Red Gobbo and his trusty squiggy steed! Again wonderful work on the candy cane stripes and I love the orangey shade of the squig which helps the gobbo’s red coat jump out at you!
Thanks everyone who took part in the Festive Finale event! And look out soon for the exciting End of Year showcase where our keen PaintSlammers pick out 2 favourite pics from the whole year and share them with us – we’ll even be doing a showcase live stream over on my Twitch channel soon!
It’s not too late to get involved, simply join the Discord* and check out the End of Year Showcase channel!
*This link will expire in 7 days from posting this blog update!
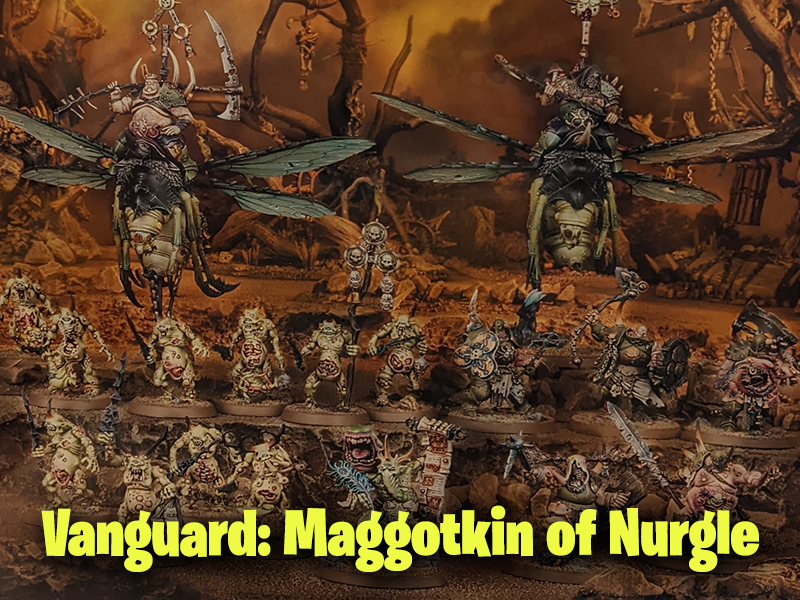
Games Workshop kindly provided me with a preview box of the new Nurgle Maggotkin starter box, the first of the new Vanguard products which are in the same style and price bracket of the Combat Patrol boxes for Warhammer 40,000. I wanted to give my thoughts on the contents of the box, as a collector and painter of Nurgle for Age of Sigmar this product immediately appealed to me.
First up, I won’t be speaking about any rules content here as I do not have the new Battletome yet – I’ll give my thoughts on that in the next week or two once it’s arrived.
This post contains affiliate links, and the review product was provided free by Games Workshop.

So inside this beefy box you get 18 miniatures:
2 Pusgoyle Blightlords (RRP £40) – One can alternatively be assembled as a hero model.
5 Putrid Blightkings (RRP £35)
10 Plaguebearers of Nurgle (RRP £22.50)
1 Spoilpox Scrivener (RRP £20)
With the box going for an RRP of £78.50 this works out at a hefty saving of around £40. And as a collector and painter, you get a good mix of both daemonic and mortal units to get your brushes around.
My favourite kit in this set is the Putrid Blightkings. Ever since they first stepped onto the battlefield during the End Times of Warhammer Fantasy, these models have stood head and shoulders as some of the coolest in the whole Warhammer range. Despite getting 5 models to a box, the kit is absolutely chock full of options when building them, meaning no two units are ever likely to be exactly the same in your army. These guys have been a key part of AoS Nurgle forces since the start, so having them in the Vanguard box already means you’ve got a very hard-hitting unit.
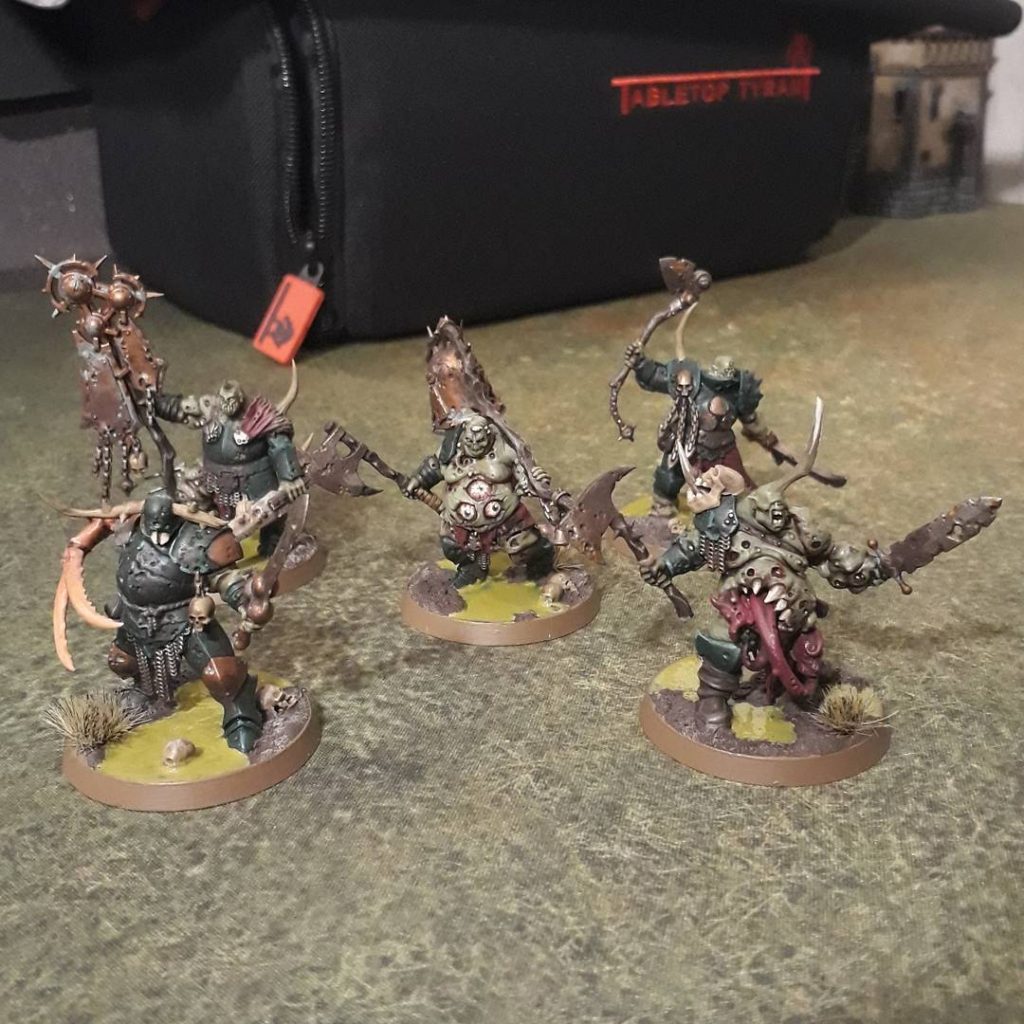
Here you can see one of my units of Blightkings – there’s plenty of fun to be had with all the unique features across these models. Each is akin to a character model rather than part of an organised unit, so you could go to town with the details. You can see that I painted eyes in the belly of the bell-carrying fellow! I also added an Orruk skull to the shoulder pauldron of one of them, a trophy from a previous battle!
The Plaguebearer kit is a little older, dating back to around 2012. It’s still a nice kit and a great way to get started painting if you’re a newer or less confident painter. You can achieve great results by simply giving them a paintjob with Contrast paints or even just washes if you prefer. You’ll definitely want to pick up more of these though – Plaguebearers generally work better in units of 20-30 models so to capitalise on these chaps you’ll need to expand with a couple more boxes of them. I’m assuming they’ll also buff up strongly with models like the Spoilpox Scrivener included with this set, as well as characters like the Sloppity Bilepiper.

The two Pusgoyle Blightlords are the most eye-catching models in the box. Two huge, bloated rotflies being ridden by elite models in the same vein as the Blightkings. These are imposing and tall models with a lot of interesting textures such as fur, wings, bloated skin and worn metal armour. Easily the most intimidating of models to paint, but if you paint your Blightkings first you’ll be surprised how easily these models come together when you sit down to put paint on them!
I’d recommend this video from Warhammer on Youtube if you need a hand on painting the wings of the rotflies – they’re large areas and definitely benefit from a bit of extra attention. The rotflies are a little trickier to assemble than most of the other stuff in the box, so take your time with them – the legs are a sort of ball and socket joint and it’s easy to knock them out of place if you rush the assembly.
One last note that I really like about this box is you’ll end up with a LOT of spare bits and gubbins for your bits box. The blightkings in particular have so much stuff you’ll be able to use on your other Nurgle models!
I’m not sure I’d change a lot about this box myself, if I was being picky I might say I’d prefer the Sloppity Bilepiper over the Spoilpox Scrivener because I like the model more – but it might be that the included model is the better choice from the Battletome.
That said, I think this is a fabulous box for new and existing Nurgle players – it’s certainly just the boost my own force needed (in addition to the new Rotbringers Sorcerer).
Will you be picking up the Maggotkin Vanguard box? Let me know in the comments if you’re grabbing one! As for me, I’m going to be waiting patiently by the door next Saturday morning hoping for my battletome and dice order to arrive!
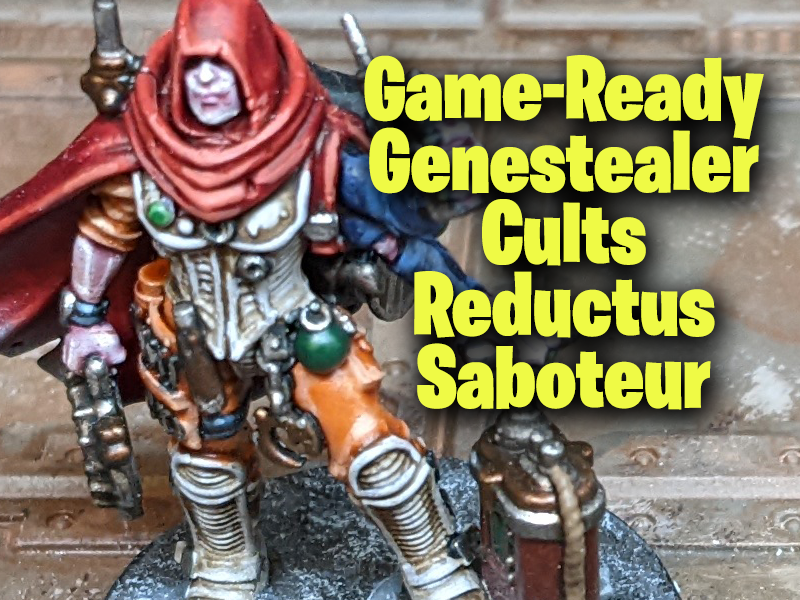
I absolutely love my Genestealer Cults, I do. So I was delighted when a free preview copy of Shadow Throne from Games Workshop arrived at my doorstep, I knew immediately I wanted to do a painting guide for the Reductus Saboteur. However, I also wanted to make the model my own, in some way. Luckily, hot on the heels of building my Necromunda Underhive Outcasts gang, I remembered I had a hooded head that I thought would go perfectly with the cape and scarf worn by the explosives specialist! I think it makes her look rather more mysterious, plus I get to use the two heads that she comes with on my next unit of Neophytes!
Disclaimer: I’m no ‘Eavy Metal painter, so I won’t pretend that I’ll ever post really high level, clean painting here on the blog. But if you’re someone who enjoys painting and wants to improve with easily achievable results I hope my tutorials will prove useful.


With my small conversion done, I started by priming the model with Grey Seer spray. You will probably notice I didn’t get the smoothest finish – it was a pretty cold and rainy day when I primed her so it definitely affected the quality of my priming. However, rather than strip it and try again another day, I was happy enough to continue. The imperfections the camera makes obvious are barely visible to the naked eye. Either that or I need new glasses…
I started by picking out all her over-armour with Agrax Earthshade, dropping some Contrast Wyldwood into the deeper recesses to help define the shapes. This gives a nice dirty/oily look to the armour.


Next up I went in with Flesh Tearer’s Red contrast on the hood and cape. Because it’s a strong colour and it’s a bit of a tight squeeze round the back of the model’s legs, you might splodge the red where you don’t want it. Luckily because we’re in the early stages, its easy to back over with Grey Seer once the red has dried and clean up the major mistakes. Next up, I picked out the face, arm and hands with Magos Purple contrast paint, to give the skin that real alien appearance.


After this, I took Gryph-Hound Orange and painted the “boiler suit” under the armour areas, and painted the chitinous armour areas with Leviadon Blue contrast. Then I picked out most of the other areas with Black Templar paint. The black templar will help any metallics look better than they would against white.


Next up, the metal areas were painted with Leadbelcher. You can see the reverse shot here of what I did on the backpack in silver and which areas I left black. I also painted the model’s claws in Incubi Darkness.


The cape and hood were highlighted in succession with highlights of Mephiston Red, Wild Rider Red and Squig Orange. I also finally remembered to apply some agrax to the metallic areas.


I highlighted the orange overalls next using Kislev Flesh, then highlighted the skin with a little bit of Wraithbone. Then I took Altdorf Guard Blue and Calgar Blue and highlighted the two blue chitin arms.


I applied Blood Angels Red to the explosive device, gore grunta fur to some of the metal areas to create a bronze effect, and then highlighted the black areas using Thunderhawk Blue and Fenrisian Grey edge highlights.


Next I used a few more contrast paints such as Ork Flesh to pick out details like grenades, screens etc. The metallics were given a quick highlight with Stormhost Silver.


Finally I painted the fuse with Steel Legion Drab (I forgot to show this, but this can be shaded with Agrax Earthshade) I applied Astrogranite texture paint to the base, painted the rock with mechanicus standard grey, and then when dry applied Agrax over all the basing materials. These areas were then drybrushed Celestra Grey. The rim of the base was painted with a few coats of Abaddon Black.
At this point, the model is ready for the tabletop. Again, it’s definitely no ‘Eavy Metal job but I think it looks great for a fairly fast game-ready level. I need to remember to put a picture of the bomb itself below here:


Alright our hobby folks! Hows things in groovetown, then? It’s December, which means it’s time for the November community showcase, sharing the lovely hobby that was submitted into the official PaintSlam Discord during the month of November 2021. Thanks again to Momma Negan for helping me with this article by collating the pics for me! Let’s get in and take a look at what you’ve been painting!
Affiliate links are included for some of the models featured in this article, if you want to help support PaintSlam when buying models.
BRIN

Lovely Orks here from Brin. I love the skin tones and the yellow armour looks fab too.
CALLIE

A mighty spaceship here from Callie! Showing my low nerd rank by not being able to identify it.
CEDA_KURU_QAN

Absolutely stonking rendition of the new Stormcast boss chap, Bastian Carthalos. The white armour is stunning.
COMMISSAR LEWDFANG


Gorgeous chaotic friends from Lewdfang, ready to knock on your door and tell you the good news about Archaon and the chaos gods.
CRITONYENTERTAINMENT


Aiaiaiaiaiai! More awesome models here from Power Rangers to Wolverine!
DARKHANON


Awesome deep red hues on these Blood Angels from DarkHanon!
FIN37

More wonderful dragon princes here frim Fin37. I love the bright blue so much.
GARDENGOTH

Gorgeous Dark Angels here, with some great freehand checks and details!
HEAVY METAL WARS


Some vintage models here from HMW, gotta love that classic Dark Angels captain.
HOUSEFIREHAWK


Water guilders and a couple of gobbos from HouseFireHawk, the orange armour really pops against the blues.
JEWELKNIGHTJESS


A mix of things from myself here, from Black Templars to Necromunda Underhive Outcasts 🙂 You may have seen some of these on the Warhammer Community website.
MOMMA NEGAN


Delaque gangers looking very sinister here amongst other models from Momma Negan. I love the old school blue gradient backgrounds too.
PANDAEMONIUM_MINIATURES
Pandaemonium is shining a light for us this month with this lovely model!
PSIPPITT


A huge pile of Orks here from Psippitt, as well as a mean looking Admech character!
SHEROQUEER


SHeroQueer brings us an eclectic mix of characters, plus the cover of her Pit-Kombat rules. Check out her Twitter to grab the PDF ruleset!
THEELUSIVESHAUN


I love this industrial terrain from TES, plus more lovely Dark Angels!
THOKAMOUS


Thokamous brings us a bright blue flyer this month, and a handful of guardsmen!
TORRENTSTRIDE


Last but definitely not least, Torrenstride brings us a fantastic branchwraith and Alarielle the Everqueen, in stunning red and grey schemes.
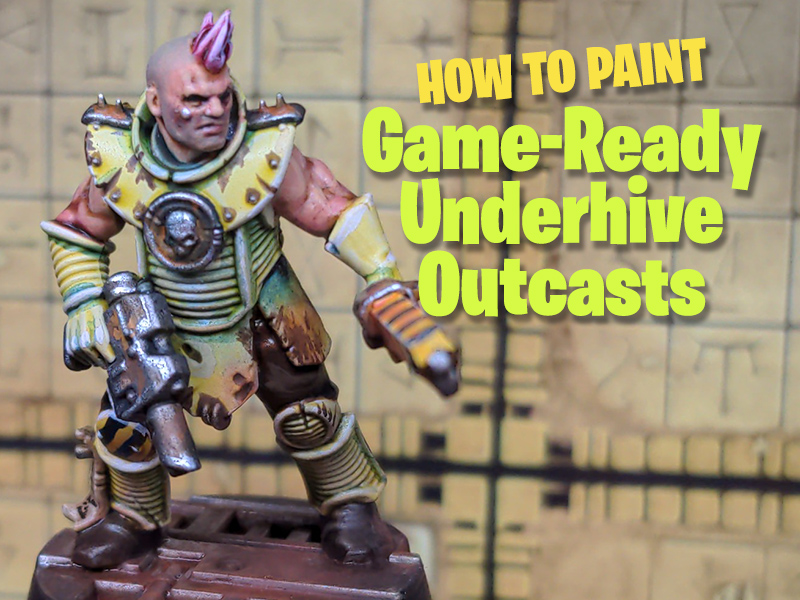
In this first guide to painting Necromunda Underhive Outcast gang members, I will run through the steps to paint one of these models in a quick way, from a game-ready standard using mostly Contrast paints, to taking the model further with extra details and highlights. This tutorial is made possible thanks to Games Workshop, who kindly provided a box of the new Necromunda Outcasts gang for me to preview.
Disclaimer: I’m no ‘Eavy Metal painter, so I won’t pretend that I’ll ever post really high level, clean painting here on the blog. But if you’re someone who enjoys painting and wants to improve with easily achievable results I hope my tutorials will prove useful. This is my first tutorial like this, so I’d love to know if this helps you out at all!


There’s a whole load of freedom with how to assemble these models, so I picked the head with the small tuft of hair, a las-pistol and chainsword. I also liked the look of this particular body. With my model assembled, I primed it with Wraithbone spray paint.
To begin with, the skin areas were given a layer of Guilliman flesh. It’s entirely possible you’ll get paint on areas where you don’t want it to, but do not fret! Simply clean up with a little wraithbone from a pot to correct any major mistakes. Any minor mistakes you might not even spot until later, so don’t worry too much for a game-ready standard.


Next I picked out the tuft of hair with Volupus Pink, and the trousers with Skeleton Horde.
I picked out all the rest of the armour areas with Plaguebearer Flesh, and the chainsword with Iyanden Yellow. At this point it’s not much to look at, but it’ll come together with the next steps. You might miss a few small areas and not spot them with a light colour like these, so it can help to take a photo of the model to help you spot mistakes. In the picture above I can see a few areas I missed with the green.


I then picked out any areas which would be metallic with Black Templar, to prepare them for the silver paint that would follow. I also decided to go over the Skeleton Horde trousers with Cygor Brown contrast paint to add further contrast and break up the plaguebearer flesh armour. Again, I used the photo above to look to see if any major mistakes presented themselves.
For the last steps for this quick Game-Ready level, I used Leadbelcher over metal areas like rivets, the gun, the chainsaw blades and motor and the skull symbol on the ganger’s chest. I also applied leadbelcher over the whole base. All these metal areas were given a coat of Agrax Earthshade wash. I also dropped agrax into the more prominent dings and scratches of the armour. I then picked out his right (our left) knee pad with Iyanden Yellow.
At this point, you could certainly call this model game ready and have it look respectable for a game of Necromunda. But there’s still work we can do to bring it up a bit! Let’s go ahead and take it further, yes!
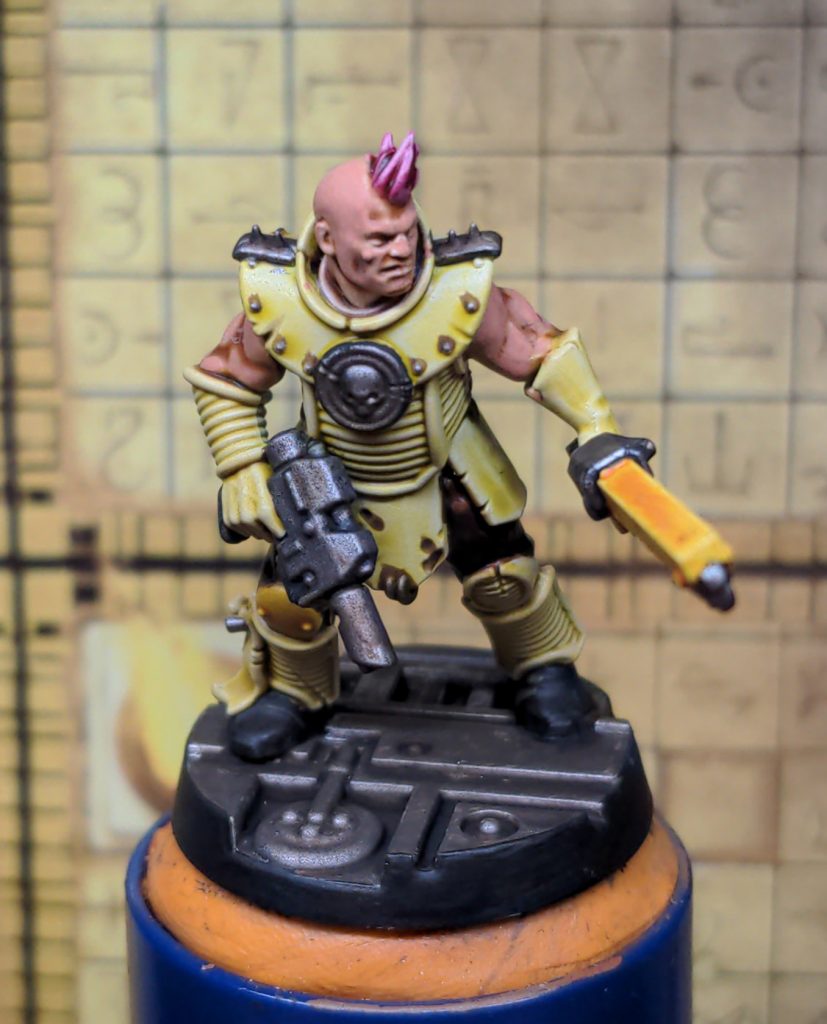

Firstly, I took Cadian Fleshtone and smoothed out the flat areas of skin whilst leaving the deeper colours in the recesses. I then highlighted this up using Kislev Flesh, making the muscles and facial details pop nicely.


To finish the skin off I used a little Magos Purple around the face and arms to vary the skin tone a little. Then, I mixed in some thunderhawk blue with the cadian fleshtone, and painted this on in thin layers to create a believable stubble effect on the top of the head and for the model’s 5 o’clock shadow.
Next up, I took Krieg Khaki and Flayed One Flesh to highlight the raised edges of all that green armour.


Next up to make the armour really pop and change up the tones, I use a little Coelia Greenshade in the recesses and also applied it towards the top of the larger flat armour panels. Then I grabbed Stormhost Silver to highlight all the metal areas, including the shoulder spikes and the skull emblem.

At this point I remembered to paint the little scrappy “purity seal” on the right boot. To do this I started by painting it Zandri Dust, then shaded over it with Agrax Earthshade. This was then highlighted up with Rakarth Flesh.


Now it’s time to break out the Black Templar again. This can be applied carefully to the purity seal to add text by using small lines and dots. I also used this to freehand some hazard stripes onto the chainsword. I didn’t measure this or anything, I Just did it by eye. It’s a little rough, but this is the underhive. This was then highlighted along the edges again with Flayed One Flesh, which also was used to pick out some scratches.
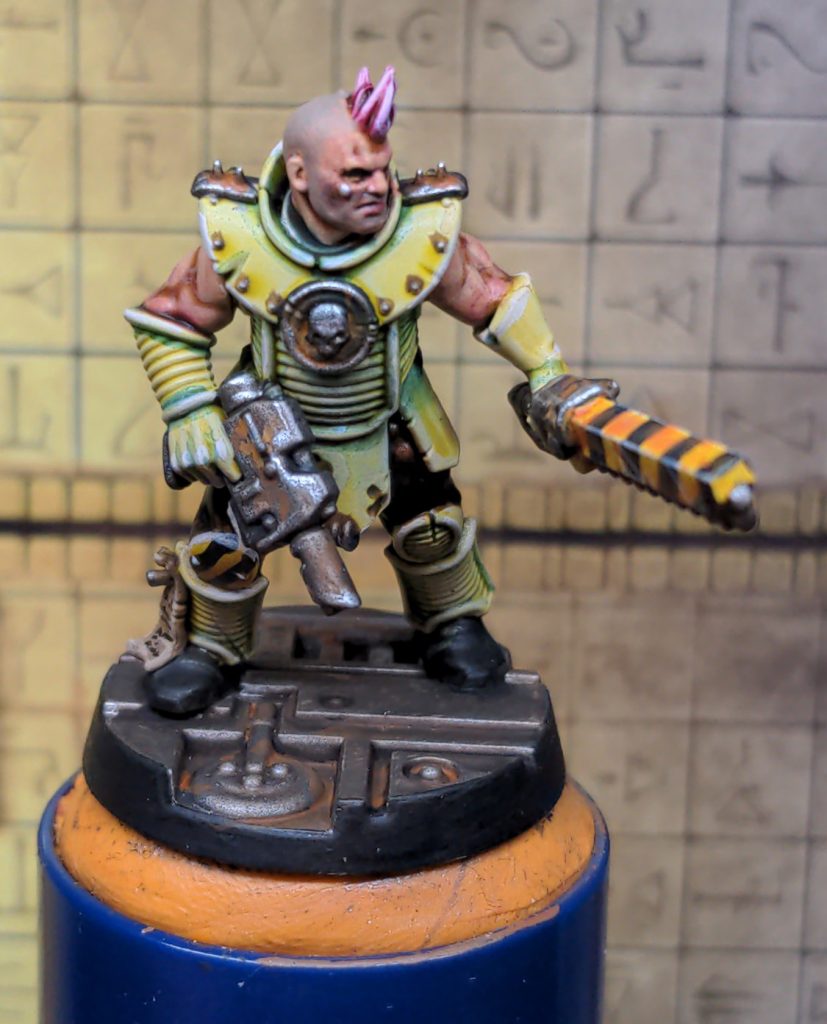
With the chainsword done, we’re getting close to the end. I took some Scrag Brown, and watered it down nice and thin. I then dropped this into recesses of the silver areas, and dotted it onto some of the flatter bits. I did the same again with a bit of Fire Dragon Bright, but in smaller areas than the Scrag Brown.


Finally, I used Thondia Brown and Baneblade Brown to highlight up the trousers. I also used dots and lines of Thondia Brown to add weathering to the armour to show where paint had chipped away. To add final touches, I used an oxide-earth pigment powder on the base, armour panels and lower legs of the model. I love how this made some of the armour look extremely old and weathered.
And that’s how the model finished up! I hope you like it, and I hope you found something interesting or useful in this little tutorial! This is the most in-depth painting post i’ve ever made I think, so please let me know if you liked it!

Finally, here’s a shot of the 4 Outcasts I’ve painted so far (from the box of 12!). The plan is to make each one quite unique from the others, so these 4 are built “out of the box” but I’ll probably raid my bits box for the next ones! I’m looking forward to painting the rest of this gang up, once again a huge thank you to Games Workshop and the Warhammer Community for the models and support.