Category: Tutorial

  • How to paint a Fire Brand Kobold!

    How to paint a Fire Brand Kobold!

    The folks at Steamforged Games kindly sent me a bunch of their Epic Encounters D&D Supplements lately, and I am in love with the miniatures in these sets. Each set contains not only miniatures but a full encounter including double sided playmats and books containing enemy stats and attacks, story beats and more. Going forward I am hoping to bring more painting tutorials for these sets to help you get your models painted to a nice gaming level!

    This Kobold is from the Shrine of the Kobold Queen set. In this tutorial I’ll show you how I painted my unit of 4 shield+spear loaded Kobolds to a playable tabletop standard.

    I started with a spray of Grey Seer undercoat. This is a very light grey, which gives colours placed over it a slightly cooler tone which befits the scales of a reptilian kobold (although some Kobolds are mammalian, I think?)

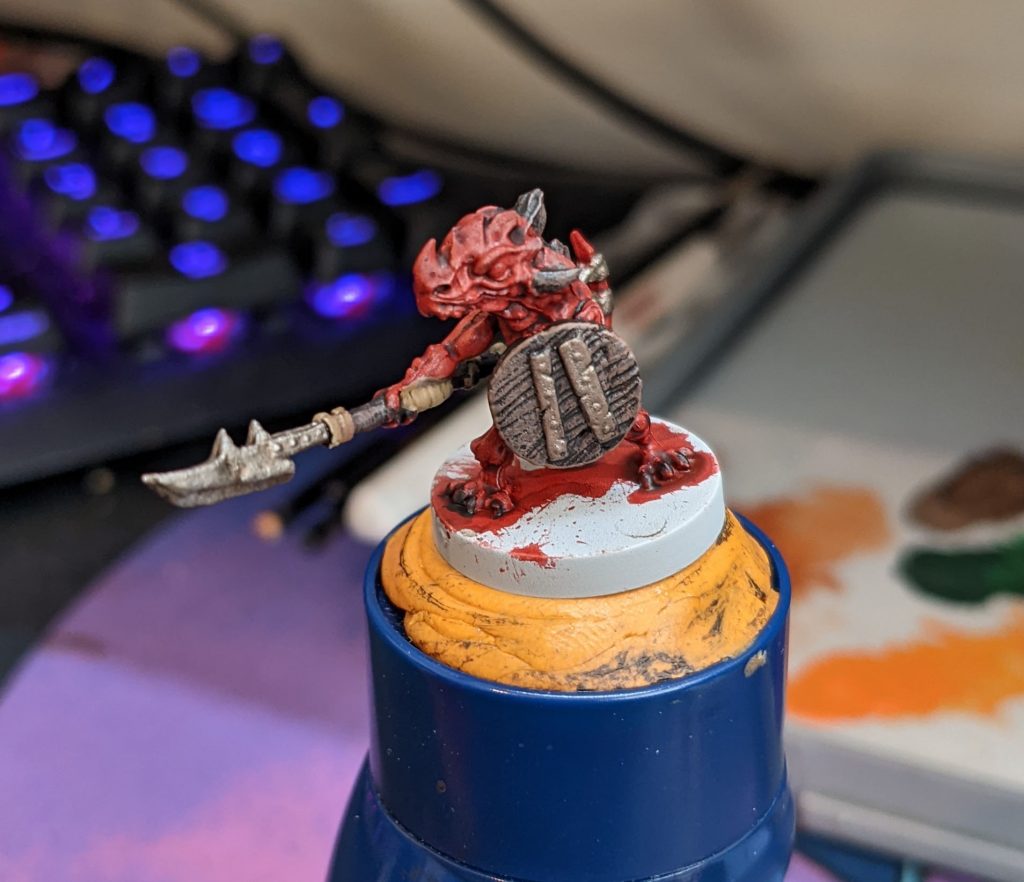
    Over this, I apply Citadel Contrast Blood Angels Red over all the Kobold scales and flesh. Don’t worry about splashing it onto other areas, since we’ll be using darker colours over most of the other areas.

    Next I took Cygor Brown contrast paint, and applied it over horns, claws, the shield, and the staff shaft. I then used Leadbelcher over all the metal areas.

    I used Zandri dust to pick out a few straps on the spear staff, then I applied Agrax Earthshade over everything so far, including the red areas to help deepen the shadows and tie the colours together.

    The horns, shield, and staff got a quick drybrush with Gorthor Brown paint to bring out some of the woodgrain texture, I also gave the edge of a shield a highlight with the same colour. Then I painted a little purple into the eye area, which will help the bright green glowing eyes pop a little more.

    The eyeball was painted first with Corax White paint, then given a plentiful coat of Tesseract Glow technical paint. I put on enough that it flowed into the sharp crevices of the eye and created a glowing effect.

    I used Ushabti Bone and Zandri Dust to highlight the straps on the spear, as well as bring out a few extra highlights upon the shield. The silver areas recieved a highlight with Mythril Silver.

    Evil Sunz Scarlet was then used on the red areas to highlight the more raised areas and brighten up the overall look of the scales and skin. I used Troll Slayer Orange next to create even smaller highlights.

    Lastly, I used Cygor Brown contrast paint once more to paint in pupils into the eyes, although this is a matter of taste and you might prefer the plan glowing style eyes. To finish the model off, the base was painted completely with Abaddon Black. You could also use a texture paint or other basing materials to match your other models, but I do my miniatures for these sets with plain black.

    And with that, the Kobold is ready to take on some brave adventurers and die for his queen. Here’s the completed group of 4 Fire Brand Kobolds…

    I hope you enjoyed this little painting guide, and if you found it useful please let me know in the comments below. Thanks once again to Steamforged Games for hooking me up! Also let me know if you’ve got any of the Epic Encounters stuff yourself, have you played any of the scenarios yet with your friends?

    If you enjoyed this article and want to help support PaintSlam, please consider joining my Patreon! Your support helps me keep the lights on and keep producing content like this!

  • Jess’s Quick Tips! How to make your eyes happy.

    Jess’s Quick Tips! How to make your eyes happy.

    I’m sure I’m not alone in having picked up a model to paint, primed it, then sat there looking at it thinking “Where do I even start? What is that detail there? I can’t quite see what it is…”

    If your eyesight and brain are anything like mine, you’ll sometimes be intimidated by odd shapes and bits on a model your eyes can’t quite “read” which makes it hard to get started. Or perhaps due to the lighting in your room or the colour/finish of the primer it’s all just a bit hard for your eyes to make out without straining them.

    So here’s my little tip! Now, this obviously will work best on a lighter undercoat (in this case I’ve used Grey Seer but anything lighter than a mid-grey will also work for this) but what I like to do is pick a wash or contrast shade and apply it all over the model as a first step, as you can see here:

    This is a model from Vae Victis Miniatures, and after priming it Grey Seer (the end of a can, hence it being a slightly rough prime) I washed over the whole model with Citadel Contrast Gryph-Charger Grey. Other good colours to use for this are washes such as Seraphim Sepia or Reikland Fleshshade.

    This highlights all the raised areas and definies all the details nicely without creating a super thick layer of paint that fills in any detail. Plus if you use a shade that you intend to use on the model anyway, it can help speed up the process overall. I used this grey/blue tone because I’ll be using Black Templar on some areas, and the blue will slightly tint the areas that don’t end up pure black and add some colour to an otherwise greyscale area.

    Now I can see what all the details on the model are, and avoid hurting my eyes trying to see what I’m looking at.

    Give it a go and see if it helps you if you’re not feeling confident when starting a new miniature!

    If you enjoyed this article and want to help support PaintSlam, please consider joining the Patreon! Your support helps me keep the lights on and keep producing content like this!

  • How to Paint: Game Ready Necromunda Underhive Outcasts!

    How to Paint: Game Ready Necromunda Underhive Outcasts!

    In this first guide to painting Necromunda Underhive Outcast gang members, I will run through the steps to paint one of these models in a quick way, from a game-ready standard using mostly Contrast paints, to taking the model further with extra details and highlights. This tutorial is made possible thanks to Games Workshop, who kindly provided a box of the new Necromunda Outcasts gang for me to preview.

    Disclaimer: I’m no ‘Eavy Metal painter, so I won’t pretend that I’ll ever post really high level, clean painting here on the blog. But if you’re someone who enjoys painting and wants to improve with easily achievable results I hope my tutorials will prove useful. This is my first tutorial like this, so I’d love to know if this helps you out at all!

    There’s a whole load of freedom with how to assemble these models, so I picked the head with the small tuft of hair, a las-pistol and chainsword. I also liked the look of this particular body. With my model assembled, I primed it with Wraithbone spray paint.

    To begin with, the skin areas were given a layer of Guilliman flesh. It’s entirely possible you’ll get paint on areas where you don’t want it to, but do not fret! Simply clean up with a little wraithbone from a pot to correct any major mistakes. Any minor mistakes you might not even spot until later, so don’t worry too much for a game-ready standard.

    Next I picked out the tuft of hair with Volupus Pink, and the trousers with Skeleton Horde.

    I picked out all the rest of the armour areas with Plaguebearer Flesh, and the chainsword with Iyanden Yellow. At this point it’s not much to look at, but it’ll come together with the next steps. You might miss a few small areas and not spot them with a light colour like these, so it can help to take a photo of the model to help you spot mistakes. In the picture above I can see a few areas I missed with the green.

    I then picked out any areas which would be metallic with Black Templar, to prepare them for the silver paint that would follow. I also decided to go over the Skeleton Horde trousers with Cygor Brown contrast paint to add further contrast and break up the plaguebearer flesh armour. Again, I used the photo above to look to see if any major mistakes presented themselves.

    For the last steps for this quick Game-Ready level, I used Leadbelcher over metal areas like rivets, the gun, the chainsaw blades and motor and the skull symbol on the ganger’s chest. I also applied leadbelcher over the whole base. All these metal areas were given a coat of Agrax Earthshade wash. I also dropped agrax into the more prominent dings and scratches of the armour. I then picked out his right (our left) knee pad with Iyanden Yellow.

    At this point, you could certainly call this model game ready and have it look respectable for a game of Necromunda. But there’s still work we can do to bring it up a bit! Let’s go ahead and take it further, yes!

    Firstly, I took Cadian Fleshtone and smoothed out the flat areas of skin whilst leaving the deeper colours in the recesses. I then highlighted this up using Kislev Flesh, making the muscles and facial details pop nicely.

    To finish the skin off I used a little Magos Purple around the face and arms to vary the skin tone a little. Then, I mixed in some thunderhawk blue with the cadian fleshtone, and painted this on in thin layers to create a believable stubble effect on the top of the head and for the model’s 5 o’clock shadow.

    Next up, I took Krieg Khaki and Flayed One Flesh to highlight the raised edges of all that green armour.

    Next up to make the armour really pop and change up the tones, I use a little Coelia Greenshade in the recesses and also applied it towards the top of the larger flat armour panels. Then I grabbed Stormhost Silver to highlight all the metal areas, including the shoulder spikes and the skull emblem.

    At this point I remembered to paint the little scrappy “purity seal” on the right boot. To do this I started by painting it Zandri Dust, then shaded over it with Agrax Earthshade. This was then highlighted up with Rakarth Flesh.

    Now it’s time to break out the Black Templar again. This can be applied carefully to the purity seal to add text by using small lines and dots. I also used this to freehand some hazard stripes onto the chainsword. I didn’t measure this or anything, I Just did it by eye. It’s a little rough, but this is the underhive. This was then highlighted along the edges again with Flayed One Flesh, which also was used to pick out some scratches.

    With the chainsword done, we’re getting close to the end. I took some Scrag Brown, and watered it down nice and thin. I then dropped this into recesses of the silver areas, and dotted it onto some of the flatter bits. I did the same again with a bit of Fire Dragon Bright, but in smaller areas than the Scrag Brown.

    Finally, I used Thondia Brown and Baneblade Brown to highlight up the trousers. I also used dots and lines of Thondia Brown to add weathering to the armour to show where paint had chipped away. To add final touches, I used an oxide-earth pigment powder on the base, armour panels and lower legs of the model. I love how this made some of the armour look extremely old and weathered.

    And that’s how the model finished up! I hope you like it, and I hope you found something interesting or useful in this little tutorial! This is the most in-depth painting post i’ve ever made I think, so please let me know if you liked it!

    Finally, here’s a shot of the 4 Outcasts I’ve painted so far (from the box of 12!). The plan is to make each one quite unique from the others, so these 4 are built “out of the box” but I’ll probably raid my bits box for the next ones! I’m looking forward to painting the rest of this gang up, once again a huge thank you to Games Workshop and the Warhammer Community for the models and support.