
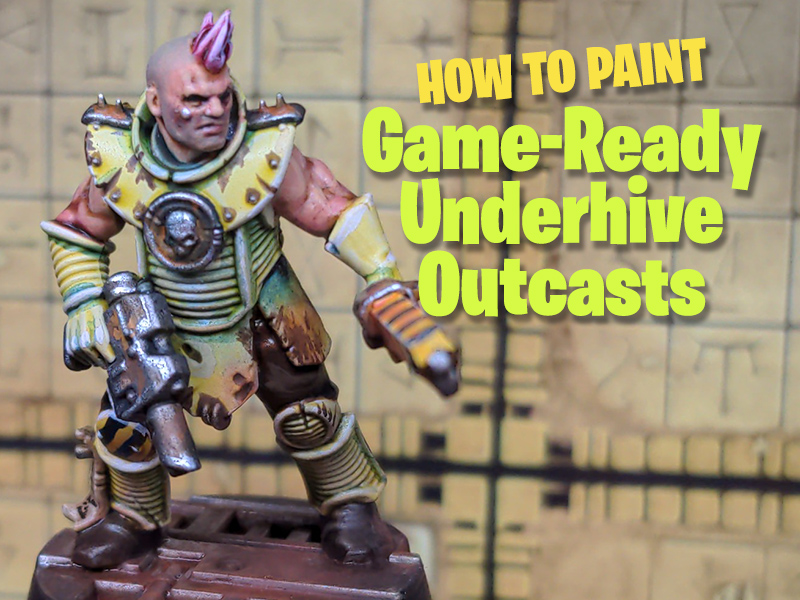
In this first guide to painting Necromunda Underhive Outcast gang members, I will run through the steps to paint one of these models in a quick way, from a game-ready standard using mostly Contrast paints, to taking the model further with extra details and highlights. This tutorial is made possible thanks to Games Workshop, who kindly provided a box of the new Necromunda Outcasts gang for me to preview.
Disclaimer: I’m no ‘Eavy Metal painter, so I won’t pretend that I’ll ever post really high level, clean painting here on the blog. But if you’re someone who enjoys painting and wants to improve with easily achievable results I hope my tutorials will prove useful. This is my first tutorial like this, so I’d love to know if this helps you out at all!


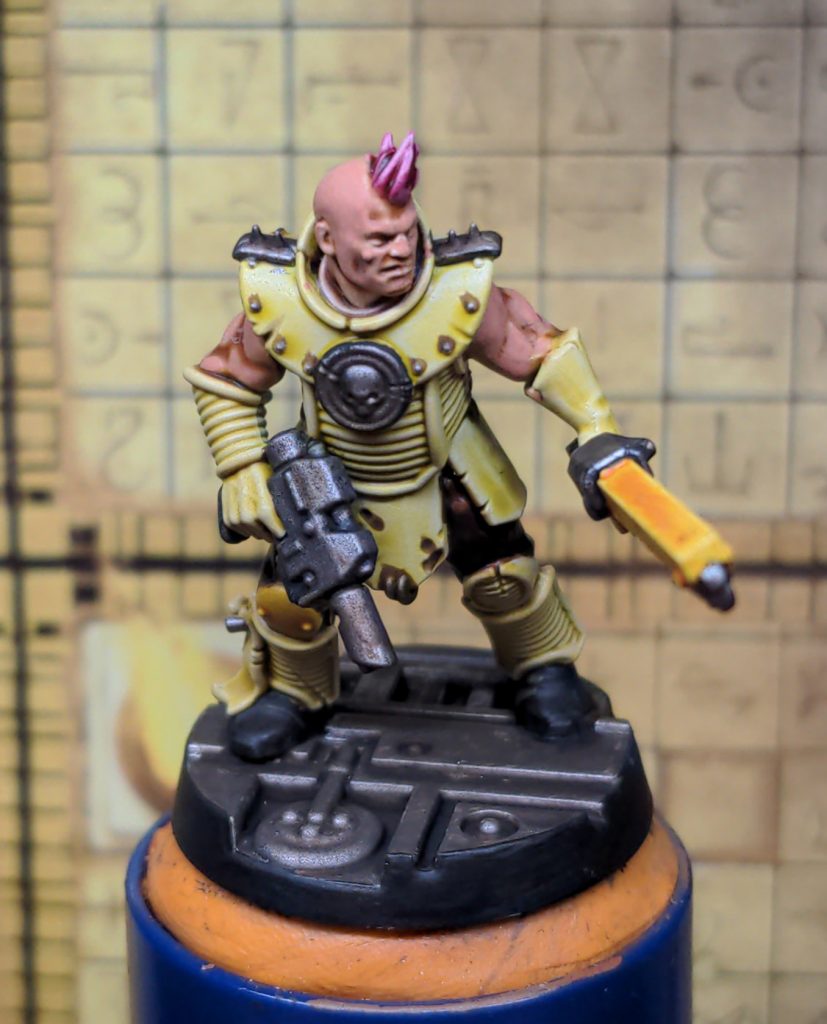
There’s a whole load of freedom with how to assemble these models, so I picked the head with the small tuft of hair, a las-pistol and chainsword. I also liked the look of this particular body. With my model assembled, I primed it with Wraithbone spray paint.
To begin with, the skin areas were given a layer of Guilliman flesh. It’s entirely possible you’ll get paint on areas where you don’t want it to, but do not fret! Simply clean up with a little wraithbone from a pot to correct any major mistakes. Any minor mistakes you might not even spot until later, so don’t worry too much for a game-ready standard.


Next I picked out the tuft of hair with Volupus Pink, and the trousers with Skeleton Horde.
I picked out all the rest of the armour areas with Plaguebearer Flesh, and the chainsword with Iyanden Yellow. At this point it’s not much to look at, but it’ll come together with the next steps. You might miss a few small areas and not spot them with a light colour like these, so it can help to take a photo of the model to help you spot mistakes. In the picture above I can see a few areas I missed with the green.


I then picked out any areas which would be metallic with Black Templar, to prepare them for the silver paint that would follow. I also decided to go over the Skeleton Horde trousers with Cygor Brown contrast paint to add further contrast and break up the plaguebearer flesh armour. Again, I used the photo above to look to see if any major mistakes presented themselves.
For the last steps for this quick Game-Ready level, I used Leadbelcher over metal areas like rivets, the gun, the chainsaw blades and motor and the skull symbol on the ganger’s chest. I also applied leadbelcher over the whole base. All these metal areas were given a coat of Agrax Earthshade wash. I also dropped agrax into the more prominent dings and scratches of the armour. I then picked out his right (our left) knee pad with Iyanden Yellow.
At this point, you could certainly call this model game ready and have it look respectable for a game of Necromunda. But there’s still work we can do to bring it up a bit! Let’s go ahead and take it further, yes!

Firstly, I took Cadian Fleshtone and smoothed out the flat areas of skin whilst leaving the deeper colours in the recesses. I then highlighted this up using Kislev Flesh, making the muscles and facial details pop nicely.


To finish the skin off I used a little Magos Purple around the face and arms to vary the skin tone a little. Then, I mixed in some thunderhawk blue with the cadian fleshtone, and painted this on in thin layers to create a believable stubble effect on the top of the head and for the model’s 5 o’clock shadow.
Next up, I took Krieg Khaki and Flayed One Flesh to highlight the raised edges of all that green armour.


Next up to make the armour really pop and change up the tones, I use a little Coelia Greenshade in the recesses and also applied it towards the top of the larger flat armour panels. Then I grabbed Stormhost Silver to highlight all the metal areas, including the shoulder spikes and the skull emblem.

At this point I remembered to paint the little scrappy “purity seal” on the right boot. To do this I started by painting it Zandri Dust, then shaded over it with Agrax Earthshade. This was then highlighted up with Rakarth Flesh.


Now it’s time to break out the Black Templar again. This can be applied carefully to the purity seal to add text by using small lines and dots. I also used this to freehand some hazard stripes onto the chainsword. I didn’t measure this or anything, I Just did it by eye. It’s a little rough, but this is the underhive. This was then highlighted along the edges again with Flayed One Flesh, which also was used to pick out some scratches.
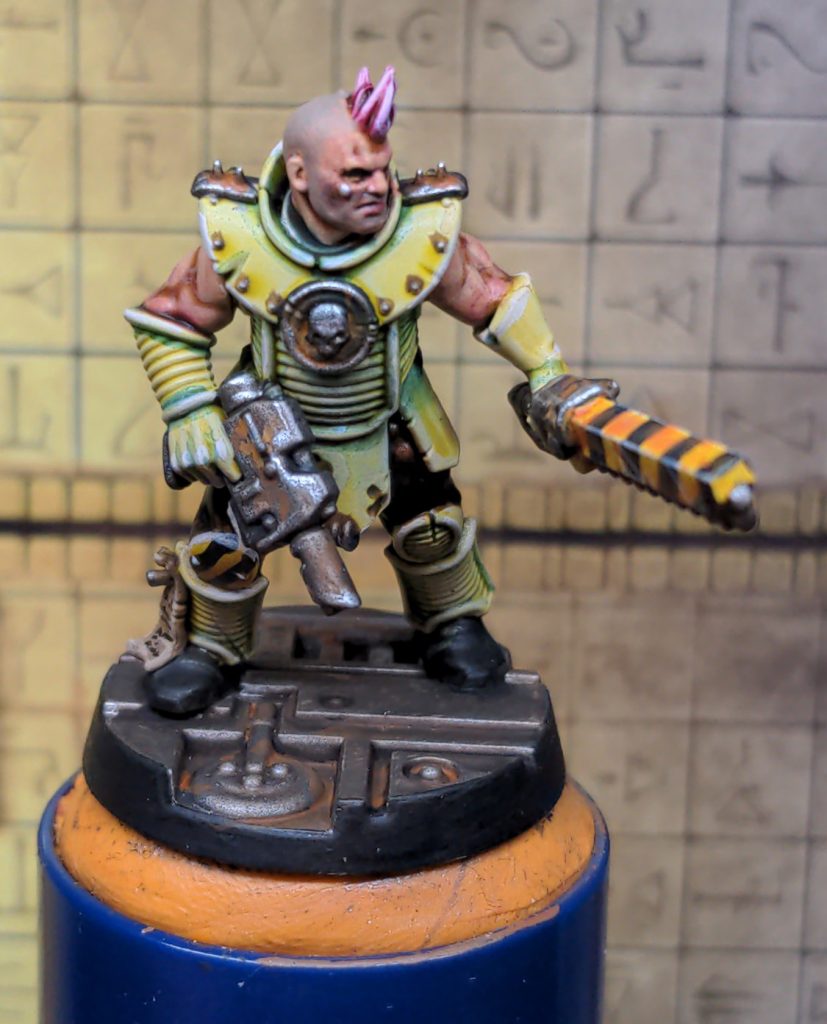
With the chainsword done, we’re getting close to the end. I took some Scrag Brown, and watered it down nice and thin. I then dropped this into recesses of the silver areas, and dotted it onto some of the flatter bits. I did the same again with a bit of Fire Dragon Bright, but in smaller areas than the Scrag Brown.


Finally, I used Thondia Brown and Baneblade Brown to highlight up the trousers. I also used dots and lines of Thondia Brown to add weathering to the armour to show where paint had chipped away. To add final touches, I used an oxide-earth pigment powder on the base, armour panels and lower legs of the model. I love how this made some of the armour look extremely old and weathered.
And that’s how the model finished up! I hope you like it, and I hope you found something interesting or useful in this little tutorial! This is the most in-depth painting post i’ve ever made I think, so please let me know if you liked it!

Finally, here’s a shot of the 4 Outcasts I’ve painted so far (from the box of 12!). The plan is to make each one quite unique from the others, so these 4 are built “out of the box” but I’ll probably raid my bits box for the next ones! I’m looking forward to painting the rest of this gang up, once again a huge thank you to Games Workshop and the Warhammer Community for the models and support.


Thanks for this tutorial ! The result is really nice !
Was surprised about using Plaguebearer flesh with this yellow color on the picture. Did you use some contrast medium or is it straight from the pot ?
It’s straight from the pot, although it’s not applied thickly!